Chapter 1: Where Hardware Meets Creativity – Why This Project?
1.1 The Convergence of Maker Education
• Sensor technology (e.g., accelerometers) is revolutionizing human-computer interaction
• The combination of visual programming (MakeCode) and game engines (Arcade) dramatically lowers creation barriers
• Project value: Learn physics, graphics programming, and interaction design through one project
1.2 Project Preview
• Real-time response: Tilt micro:bit to control on-screen ball movement
• Dynamic trails: Colorful traces create abstract paintings
• Basic interaction: Button-controlled color switching
• Educational extension: Teach coordinate systems, acceleration principles, and color theory
Chapter 2: Hardware and Tools Setup
2.1 Materials List
| Equipment/Tool |
Description |
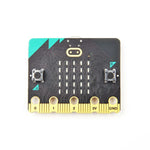
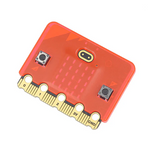
| micro:bit V2 |
Main controller with accelerometer |
| USB cable |
For power and data transfer |
| Computer/Tablet |
Chrome/Firefox browser required |
2.2 Development Environment Setup
-
Visit Microsoft MakeCode for micro:bit
-
New Project → Click Extensions → Add mashup extension (enables micro:bit support)
-
Connect hardware: Plug micro:bit into computer via USB
Chapter 3: Building the Painting Ball from Scratch (Full Code + Line-by-Line Analysis)
3.1 Initialization
// ----- Global Variables -----
let ballX = 80;       // Initial X position (screen center)
let ballY = 60;       // Initial Y position
let colorIndex = 2;   // Default color: palette index 2 (red)
let trailAlpha = 6;   // Trail transparency (0-15, lower = more transparent)

// ----- Ball Bitmap Definition -----
let ball = bmp`
    . . . . . . . .
    . . 2 2 2 2 . .
    . 2 2 2 2 2 2 .
    . 2 2 2 2 2 2 .
    . 2 2 2 2 2 2 .
    . 2 2 2 2 2 2 .
    . . 2 2 2 2 . .
    . . . . . . . .
`;
Key Analysis
-
bmp creates an 8x8 bitmap; . = transparent, 2 = red in default palette
-
3.2 Button Events: Color Switching & Clear Screen
// ---- A Button: Cycle Colors ----
controller.A.onEvent(ControllerButtonEvent.Pressed, () => {
    colorIndex = (colorIndex % 15) + 1; // Cycle through colors 1-15
    ball.replace(2, colorIndex);       // Replace all '2' pixels with new color
    music.playTone(262, 100);         // Audible feedback: C4 tone, 100ms
});

// ---- Menu Button: Clear Canvas ----
controller.menu.onEvent(ControllerButtonEvent.Pressed, ()=>{
    screen.fill(0);                   // Fill screen with transparent black
    ballX = 80; ballY = 60;          // Reset ball position
});
Interaction Design:
• replace()
• Position reset ensures clean restart after clearing
3.3 Core Logic: Accelerometer Control & Rendering
// ---- Main Update Loop (60 FPS) ----
game.onUpdate(() => {
    // Accelerometer mapping: X/Y axis (-2000~2000) → Normalized (-10~10)
    ballX += input.acceleration(Dimension.X) / 200;
    ballY += input.acceleration(Dimension.Y) / 200;

    // Boundary constraints
    ballX = Math.constrain(ballX, 0, 152); // 160-8=152 (ball width)
    ballY = Math.constrain(ballY, 0, 112); // 120-8=112

    // Draw semi-transparent trail
    screen.fillRect(ballX, ballY, 8, 8, colorIndex + (trailAlpha << 4));

    // Draw ball
    screen.drawTransparentBitmap(ball, ballX, ballY);
});
Physics & Graphics:
• Normalization formula: Δposition = acceleration / sensitivity
• constrain() keeps coordinates within [min, max] range
• Hex color encoding: 0xRRGGBBAA → trailAlpha << 4 shifts transparency value
Chapter 4: Technical Deep Dive – Key Mechanisms
4.1 Accelerometer Data Processing
• Dual-axis input: X (left-right), Y (front-back)
• Noise reduction: Moving average filter
// Example: Smooth accelerometer data
let smoothX = (input.acceleration(Dimension.X) * 0.2) + (smoothX * 0.8);
4.2 Color System & Palette
• 16-color default palette (modifiable via code)
// Custom palette example
palette.setColors(1, 0xFF0000); // Set index 1 to red
4.3 Advanced Bitmap Operations
• Runtime pixel manipulation:
// Set pixel color at (3,3)
ball.setPixel(3, 3, 5); // Yellow (index 5)
Chapter 5: Project Expansion – More Ideas & Educational Applications
5.1 Creative Extensions
| Extension |
Implementation |
| Dual-Player Mode |
Two micro:bits controlling competing balls |
| Environmental Interaction |
Use temperature sensor to adjust colors |
5.2 Educational Use Cases
• Physics class: Analyze acceleration-velocity relationships via trails
• Art class: Explore color theory (RGB mixing, complementary colors)
• Programming concepts: Event-driven logic, loops, debugging
Chapter 6: FAQs & Debugging
6.1 Common Issues
• Symptom: Code fails to upload
Solution:
-
Check USB connection
-
Restart MakeCode editor
6.2 Performance Optimization
• Render optimization:
// Only update changed areas
screen.fillRect(ballX, ballY, 8, 8, 0); // Erase previous position
7.1 Learning Materials
• Official docs: MakeCode Arcade API Reference
• Video tutorials: YouTube channel MakeCode Minute
7.2 Open Source Projects
• GitHub: microsoft/makecode-arcade-games
• Community Gallery: MakeCode Arcade Gallery
Conclusion: From Toy to Tool
• Future possibilities: Integrate more sensors (light, temperature)
• Educational impact: Develop "physical-digital" thinking skills
• Call to action: Start creating – turn ideas into interactive art!