1. Introduction: The Evolution of micro:bit
1.1 A Brief History of micro:bit
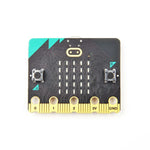
The BBC micro:bit, launched in 2016 as part of the UK’s "Make It Digital" initiative, has revolutionized STEM education. With over 30 million devices distributed globally, it has empowered students to explore coding, robotics, and IoT. However, its 5x5 LED grid—while iconic—limited creative expression.
1.2 The Display Shield Revolution
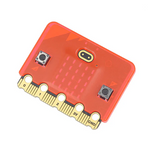
In 2024, the Display Shield emerged as a groundbreaking add-on, transforming the micro:bit into a versatile tool for interactive projects. Designed for educators and makers, it combines simplicity with advanced capabilities.
Why It’s Revolutionary:
-
Plug-and-Play Design: No soldering or complex wiring.
-
Educational Focus: Aligns with global STEM curricula.
-
Creative Freedom: From games to scientific tools, possibilities are endless.
2. Hardware Deep Dive: Engineering the Display Shield
2.1 Core Components
The Display Shield’s hardware is engineered for reliability and performance:
-
Screen: 1.8-inch TFT LCD (160x120 pixels, 16-bit color).
-
Buttons: Tactile D-pad and X/Y/Z function keys.
-
Power Management: Dual power modes (3.3V micro:bit or 3.7V external battery).
Ergonomic Design:
2.2 Power Optimization
-
Battery Life: Up to 6 hours with a 1000mAh lithium battery.
-
Auto-Dimming: Adjusts brightness based on ambient light.
-
Low-Power Mode: Disables non-essential features (e.g., backlight).
3. Software Ecosystem: MakeCode and Beyond
3.1 Screen Drawing & Pixel Control
The Display Shield’s MakeCode extension provides powerful APIs for screen manipulation. Below are key features demonstrated through code examples:
Example 1: Button-Triggered Screen Actions
Use Case: Dynamic background switching or a simple drawing app.
Example 2: Pixel & Shape Drawing
Technical Notes:
-
drawRect(x, y, width, height, color): Draws hollow rectangles.
-
fillRect(): Renders solid rectangles with higher efficiency.
3.2 Bitmap Operations & Advanced Graphics
Example 3: Dynamic Bitmap Creation
Optimized Version Using Line Drawing
Advantage: Reduces loops for better performance.
4. Step-by-Step Project Tutorials
Project 1: Interactive Pixel Art Canvas (Difficulty: ★★☆)
Features:
-
Move a cursor with the D-pad.
-
Change colors with A/B buttons.
-
Save artwork to micro:bit storage.
Code Implementation:
5. Advanced Development: Beyond the Basics
5.1 Performance Optimization
Strategy: Use off-screen bitmaps to cache complex graphics.
Result: Reduces full-screen redraws, achieving 30+ fps.
6. Educational Integration: Lesson Plans & Classroom Use
6.1 Middle School: Digital Art & Geometry
Objective: Explore symmetry and patterns through pixel art.
Activity:
1. Students design symmetrical shapes using drawRect and drawLine.
2. Use loops to replicate patterns across the screen.
3. Export artwork as bitmaps and analyze geometric properties.
Sample Code:
7. Troubleshooting & Optimization
7.1 Common Issues
• Screen Flickering:
○ Fix: Use an external battery or reduce brightness.
• Slow Rendering:
○ Fix: Avoid large bitmaps (>32x32) in animations.
7.2 Memory Management
8. Conclusion: Join the Revolution
The Display Shield transforms the micro:bit into a canvas for innovation. Whether you’re a student sketching pixel art or a developer prototyping IoT solutions, this tool bridges imagination and reality.
Get Started Today:
-
Explore: Dive into the MakeCode Library.
-
Share: Post projects with #DisplayShield.
-
Innovate: Push boundaries and inspire the next generation!